


The Firebase Realtime Database is a NoSQL database hosted in the cloud. Data is synchronized in real time with every client on all platforms (Web, iOS, and Android). The data is stored as JSON and is shared by all of your customers when you create cross-platform apps. This ensures that all of your clients always have the most recent data available, even when offline.
You can find the complete code for this article in our Github examples repository, or watch the video walkthrough on our Youtube channel.
Firebase is a cloud-based platform from Google that allows you to build web and mobile applications quickly. It offers authentication, data storage, monitoring, logging, and deployment services. The Realtime Database is one of the services offered to developers. You can access the data from a Firebase Realtime Database using a REST API. But it lacks a GraphQL API, which we'll be creating using StepZen.
Set up Firebase Realtime Database
The first step to using a Firebase service is to create a free account in the Firebase console if you haven't already. You receive a brand-new Firebase app with a unique URL that ends in firebaseio.com. This URL is used to store and sync data to the app's database and authenticate your users.
Within the Firebase console, you need to create a new project; let's name it "StepZen demo". The setup asks you several configuration questions, which you can ignore for the sake of this demo. Within a few minutes, your new Firebase project is ready, and you can continue by adding a Realtime Database by using the navigation on the left side of the page.
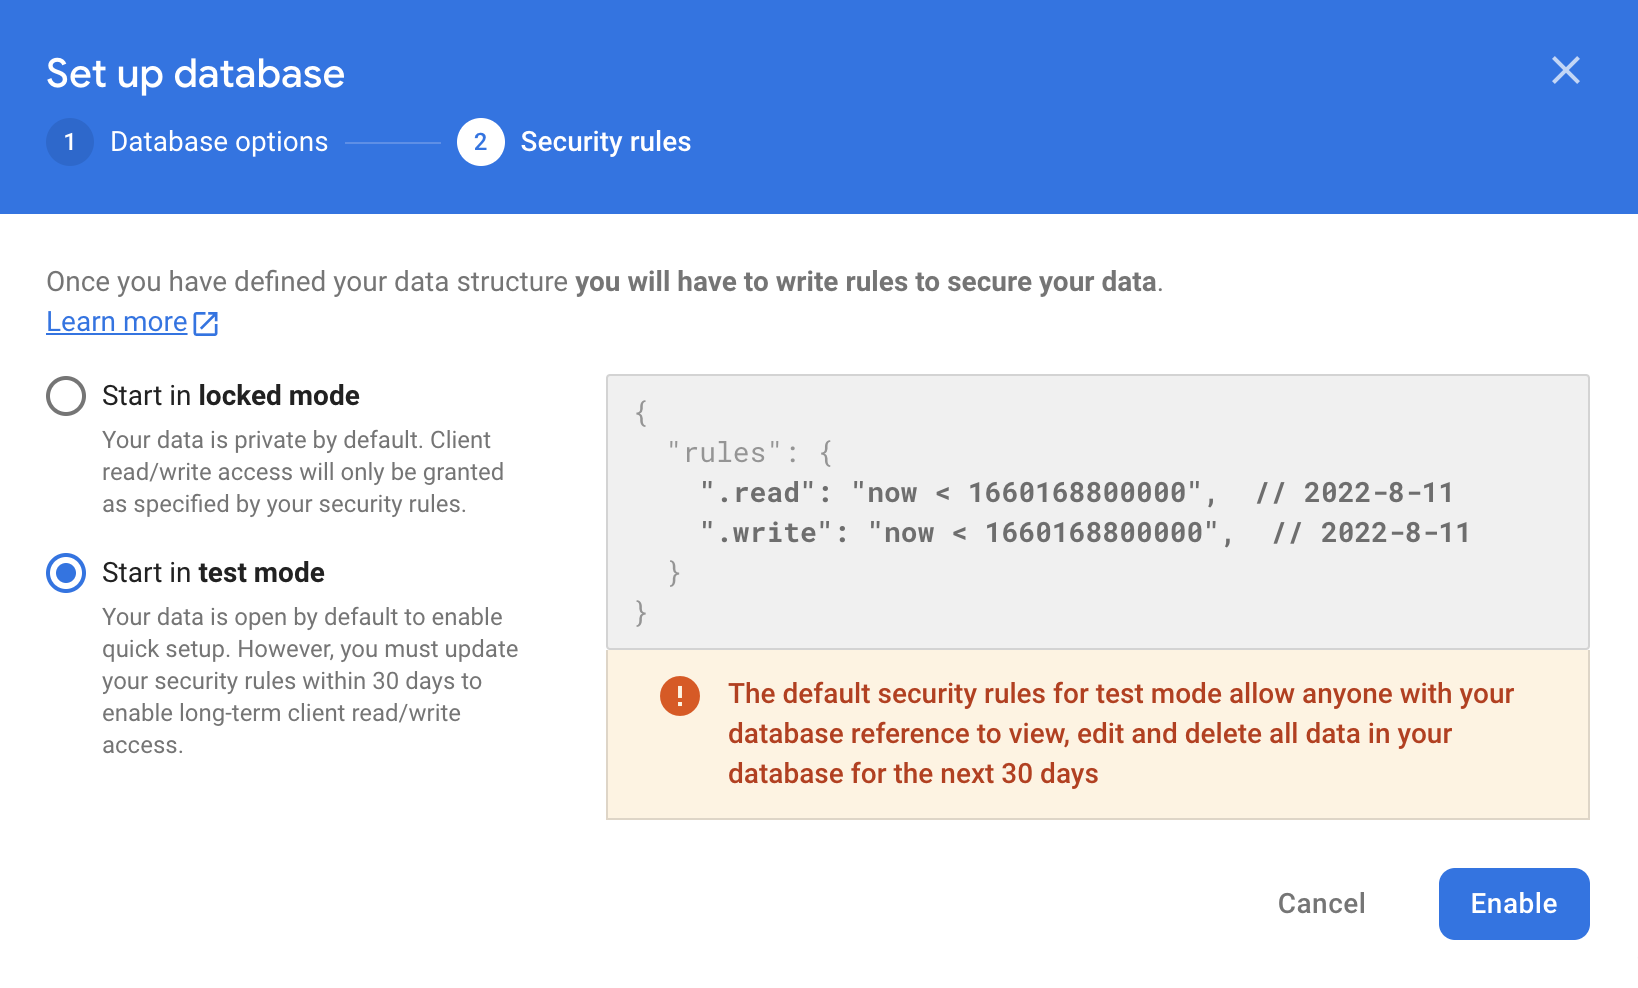
When you press "Create database," you need to select the region you want the database to be created in. In example, the United States, Europe, or Asia. Also, you need to configure the security settings for the Realtime Database. At first, you need to enable "test mode" to make it easier to create and read our first data:
By pressing "Enable" your database is created in the region that you selected. Depending on the region of your databsae the URL is either YOUR_FIREBASE_PROJECT_ID.firebaseio.com (for databases located in us-central1) or YOUR_FIREBASE_PROJECT_ID.REGION.firebasedatabase.app for databases in all the other locations.
The final step is adding data to the database, which you can do from the Firebase console or through the REST API. To get initial data into the database, we'll be using the Firebase console to upload the JSON file init.json that you can find in the Github repository for this post here. By pressing the three dots on the right side of the screen, you can select "Import JSON".
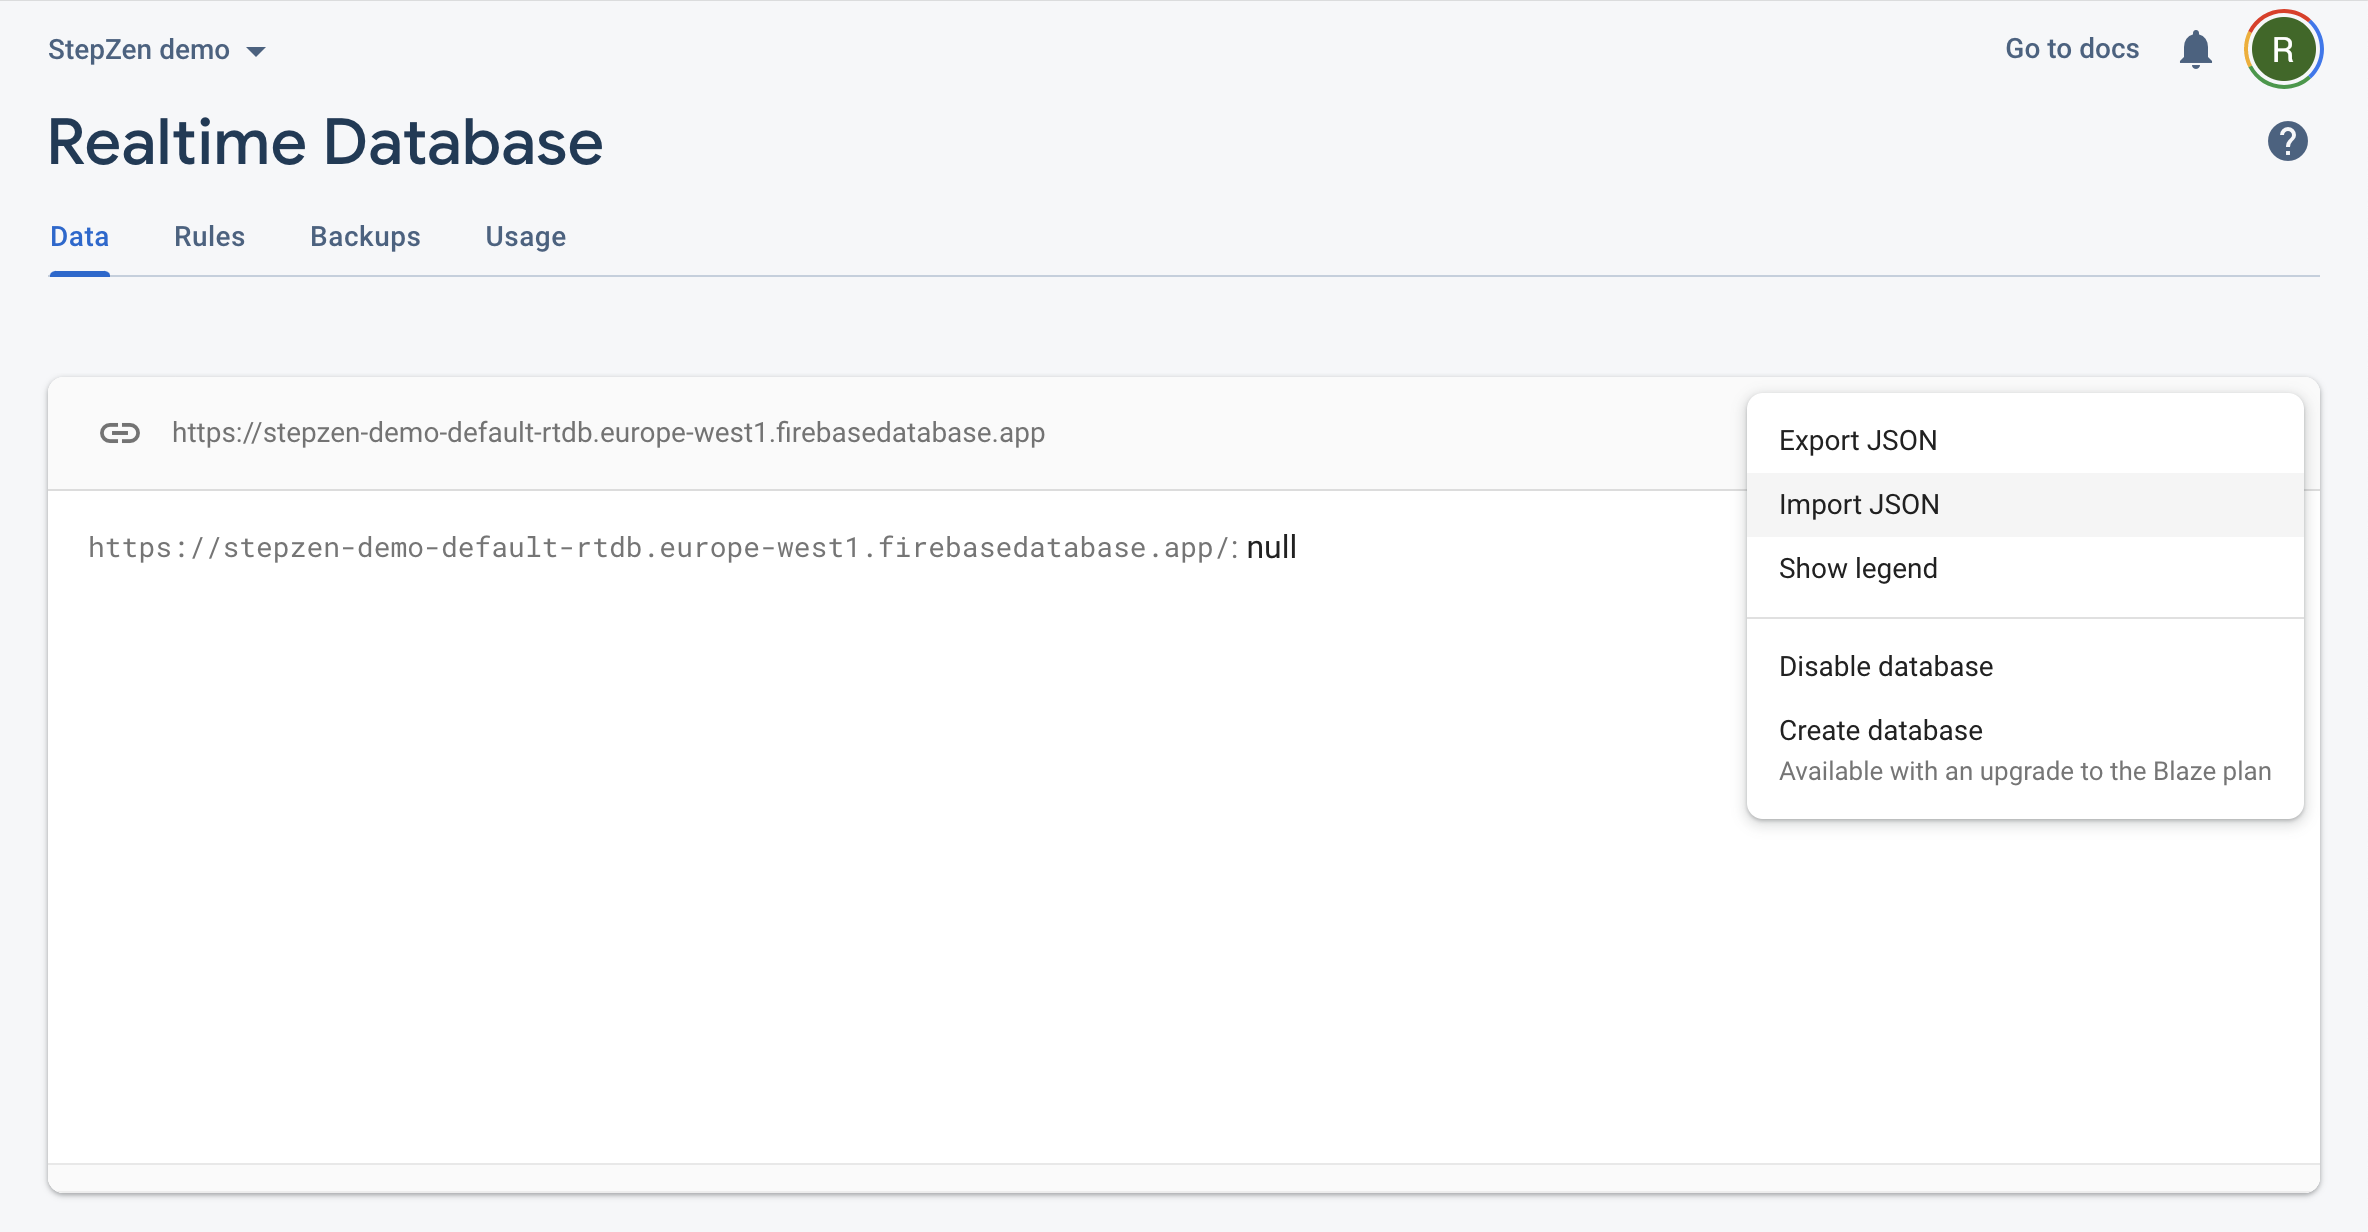
After uploading the data, you can see in the Firebase console that there are customers and orders in the database. That's it. Your Firebase Realtime database is ready to go. In the next step, we'll be creating the StepZen GraphQL schema.
Generate a GraphQL schema
You can retrieve data from the Firebase Realtime database using their REST API. An example curl request to get a single customer would be:
`curl 'https://YOUR_FIREBASE_PROJECT_ID.firebaseio.com/customers/-N6rOmxa7vOOTpZZSllL.json'`
With StepZen, we can use the same curl command to create a GraphQL API that retrieves the same data. First, you need to install the StepZen CLI using:
`npm i -g stepzen`
And run the command to convert the Firebase REST API to GraphQL. In this command, you can see the initial curl is used together with a few flags to name the generated query and response type:
`stepzen import curl 'https://YOUR_FIREBASE_PROJECT_ID.firebaseio.com/customers/-N6rOmxa7vOOTpZZSllL.json' --name customer --query-name getCustomerById --query-type Customer`
Note that if you haven't signed up for StepZen, your GraphQL API is deployed on a public endpoint. If you're planning to store sensitive data we recommend signing up so that an API key secures your GraphQL API endpoint.
After the StepZen CLI has finished converting the REST API request to a GraphQL schema, several files have been created:
myproject
  |-- customer
      |-- index.graphql
  |-- index.graphql
  |-- stepzen.config.json
In the file customer/index.graphql, you can find the generated GraphQL schema.
To deploy this GraphQL schema and query your new GraphQL API, you need to run
`stepzen start`
The StepZen CLI then deploys the GraphQL schema and return your endpoint directly in the terminal. This looks like https://public***.stepzen.net/api/with-firebase/__graphql when you haven't signed up for StepZen. If you do have an account, two endpoints are available.
- a localhost endpoint that contains the GraphiQL IDE, and
- a production-ready endpoint that can be accessed by providing your StepZen API key.
Learn more about the different endpoints in the documentation.
Visiting this public URL (either localhost or starting with https://public***) lets you query the endpoint using GraphiQL:
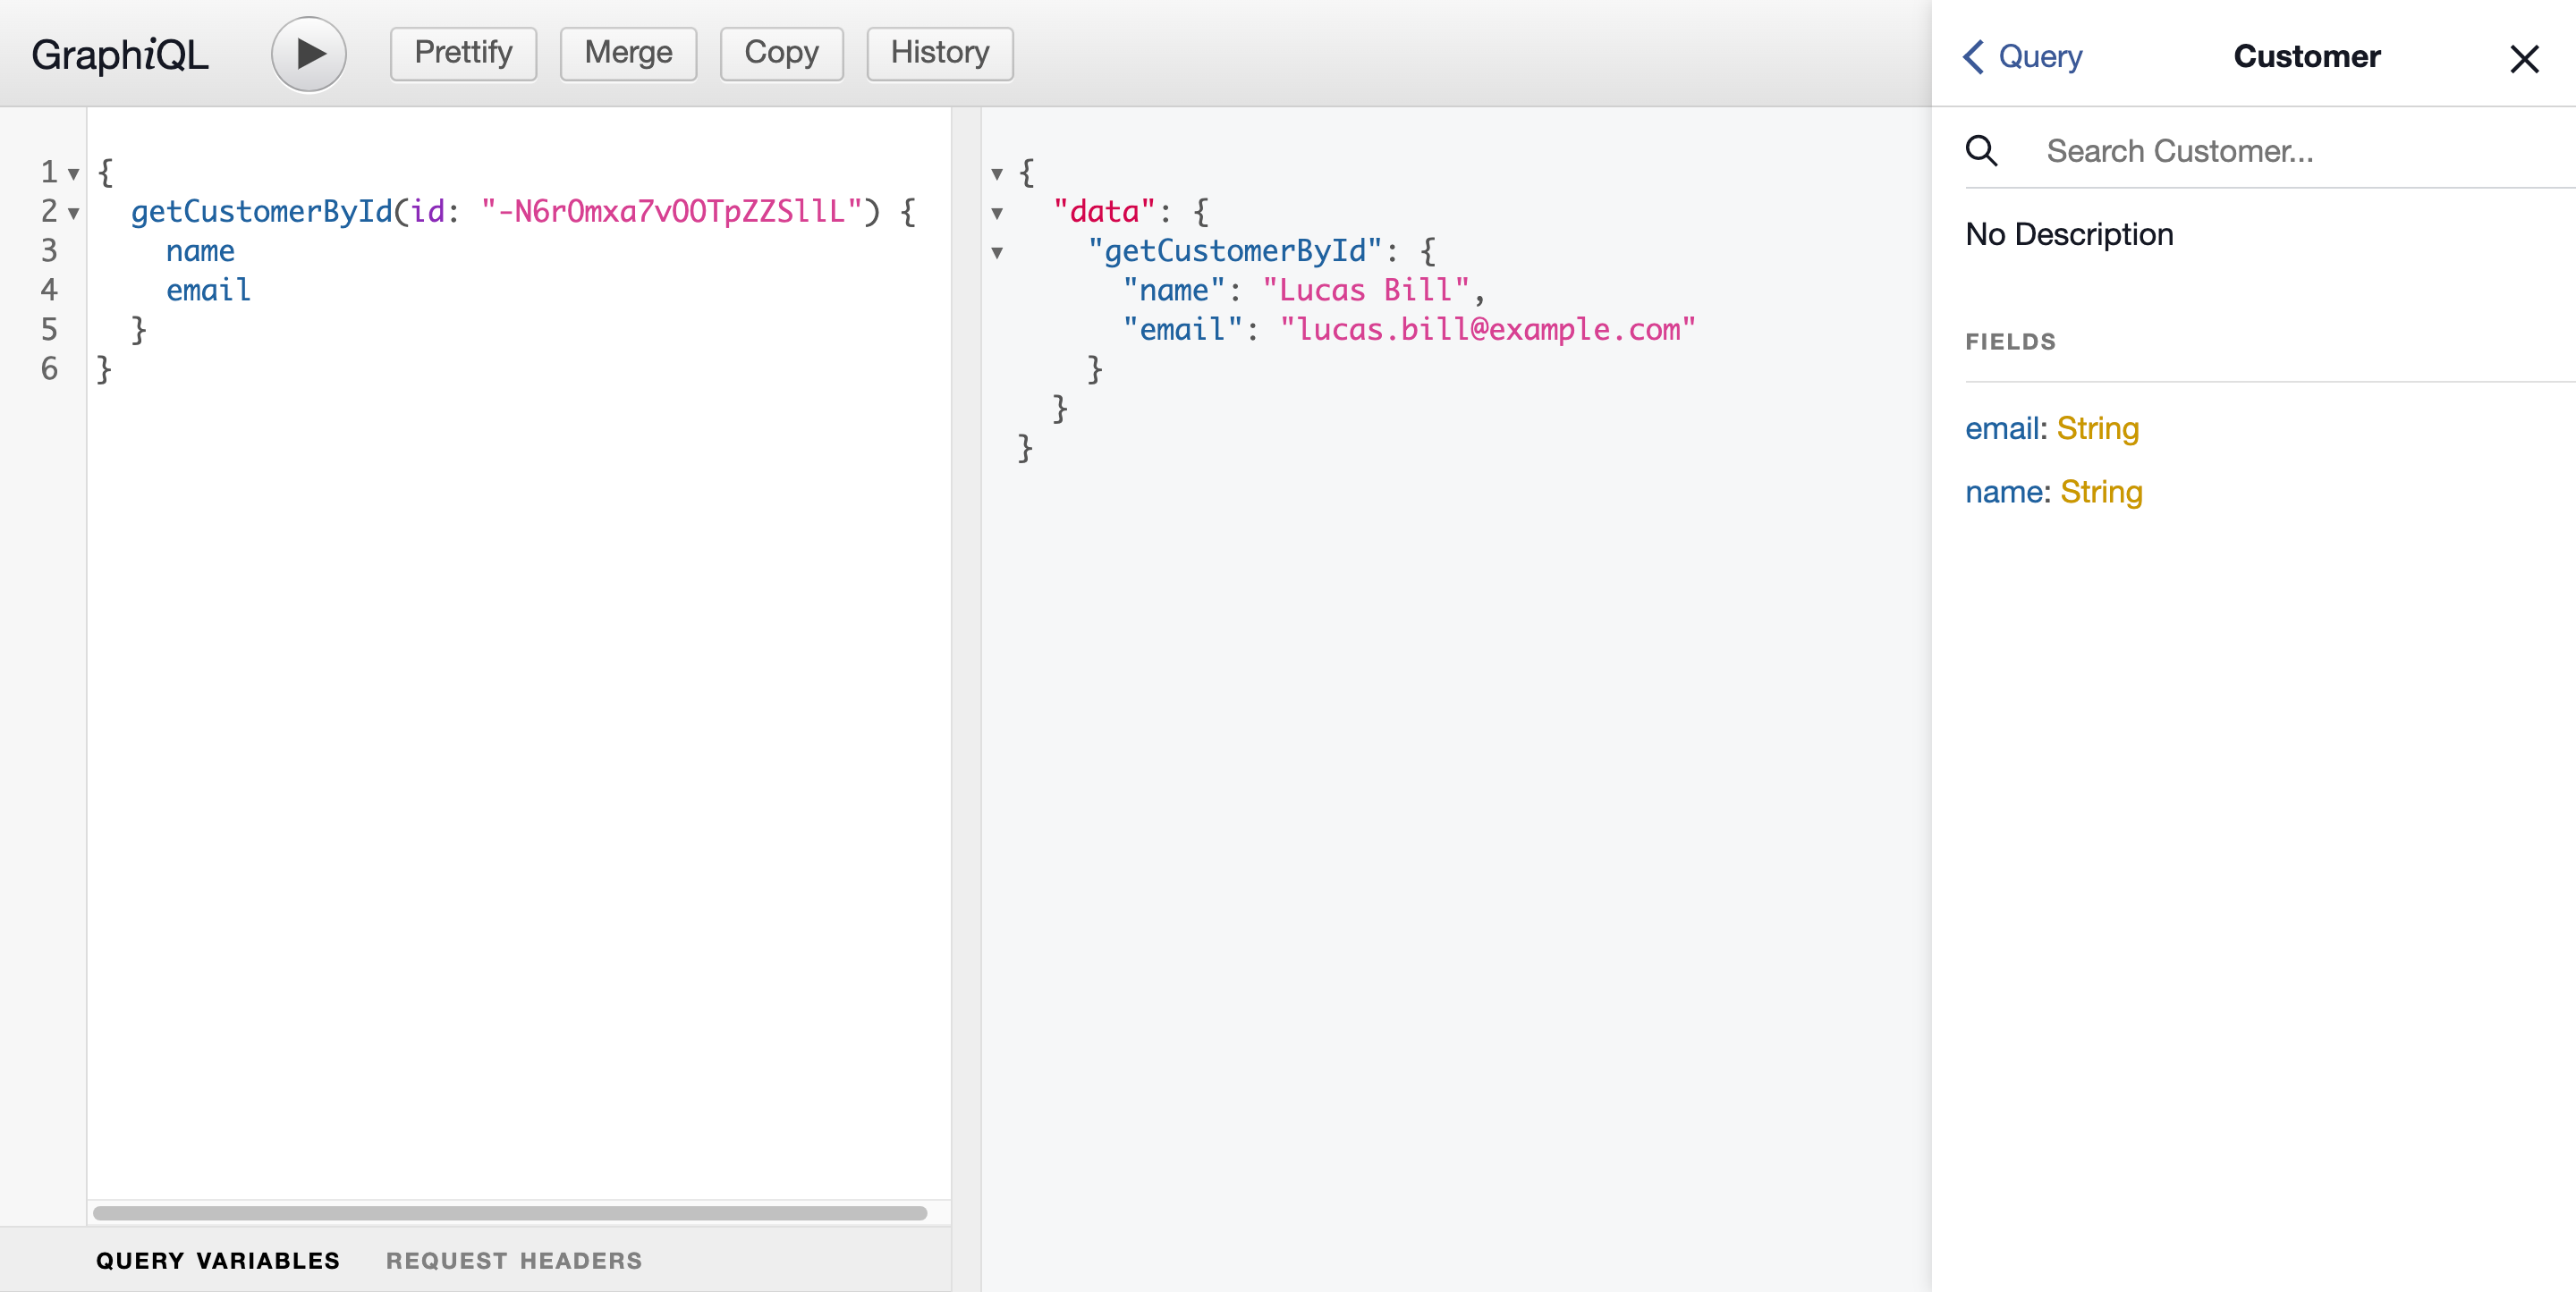
From here, you can query the GraphQL API and inspect what the response types in the schema look like.
Let's continue in the next section by adding a query to get all customers at once.
Transform API responses
Besides getting a single customer, you can also get all customers from the Firebase Realtime Database. But it has one caveat, as you'll learn once we get the data using the REST API.
The curl to get this list is similar to the request we've used in the previous section:
`curl 'https://YOUR_FIREBASE_PROJECT_ID.firebaseio.com/customers.json'`
And we can add it to the GraphQL schema in customer/index.graphql manually or by running another stepzen import curl command. The second option has a caveat as the imported schema shows the message:
`Result typed as JSON since it has fields ['-N6rOmxa7vOOTpZZSllL', ...] that are invalid graphql identifiers`
The request response to the REST API returns JSON in an unsupported format. The REST API returns a list of key-value pairs with field names representing the key instead of an array.
Therefore you need to transform this object into an array to get a list of customers. If you've used the StepZen CLI to import the endpoint, you need to add the transforms field to the getCustomers query. Or, if you haven't, you can add the getCustomers query from the code block below to the schema in customers/index.graphql
type Query {
  getCustomerById(id: ID!): Customer
    @rest(
      ##
    )
  getCustomers: [JSON]
    @rest(
      endpoint: "https://YOUR_FIREBASE_PROJECT_ID.firebaseio.com/customers.json"
      transforms: [{ pathpattern: [], editor: "objectToArray" }]
    )
}
The response type for this query is now [JSON] as the StepZen CLI couldn't generate the GraphQL type automatically as GraphQL doesn't support key-value pair lists. On the GraphiQL IDE for your endpoint, you can already query the results for getCustomers, but you won't be able to select any fields.
Therefore we need to add the GraphQL response type manually. Type Customer was already generated when you imported the Firebase REST API endpoint to get a single customer and add a second type for the transformed key-value pair with the type CustomerList:
type Customer {
  email: String
  name: String
}

type CustomerList {
  name: ID
  value: Customer
}

type Query {
  getCustomerById(id: ID!): Customer
    @rest(
      ##
    )
  getCustomers: [CustomerList]
    @rest(
      endpoint: "https://YOUR_FIREBASE_PROJECT_ID.firebaseio.com/customers.json"
      transforms: [{ pathpattern: [], editor: "objectToArray" }]
    )
}
Note that you can also use the tool JSON2SDL to convert the JSON response to GraphQL SDL automatically.
When you go back to the GraphiQL browser, you can now also query the list of customers and determine the fields that the GraphQL API should return:
query {
  getCustomers {
    name
    value {
      email
      name
    }
  }
}
Even though the response is the same as the previous query, you now have complete control over which fields are returned. If you'd run the same query and remove the field email in value, only the name of the customer will be returned.
In the next section, we'll combine the customer information with the orders we've previously imported into the GraphQL schema.
Combine data in GraphQL
Next to customer data, we also have order data in the Firebase Realtime Database. To combine the customer data with the order data, we need to create the query to get the orders from the Firebase Realtime Database.
Again you can use the StepZen CLI to convert the REST API to a GraphQL API. We'll start by importing a single order so that the return type is autogenerated:
`stepzen import curl 'https://YOUR_FIREBASE_PROJECT_ID.firebaseio.com/orders/-N6rOvLXK2t39x-Bp0UP.json' --name orders --query-name getOrderById`
This adds the new query getOrderById with the response type Order to a new schema in order/index.graphql:
myproject
  |-- customer
      |-- index.graphql
  |-- order
      |-- index.graphql
  |-- index.graphql
  |-- stepzen.config.json
Both the schemas are linked in
index.graphqlin the project's root.
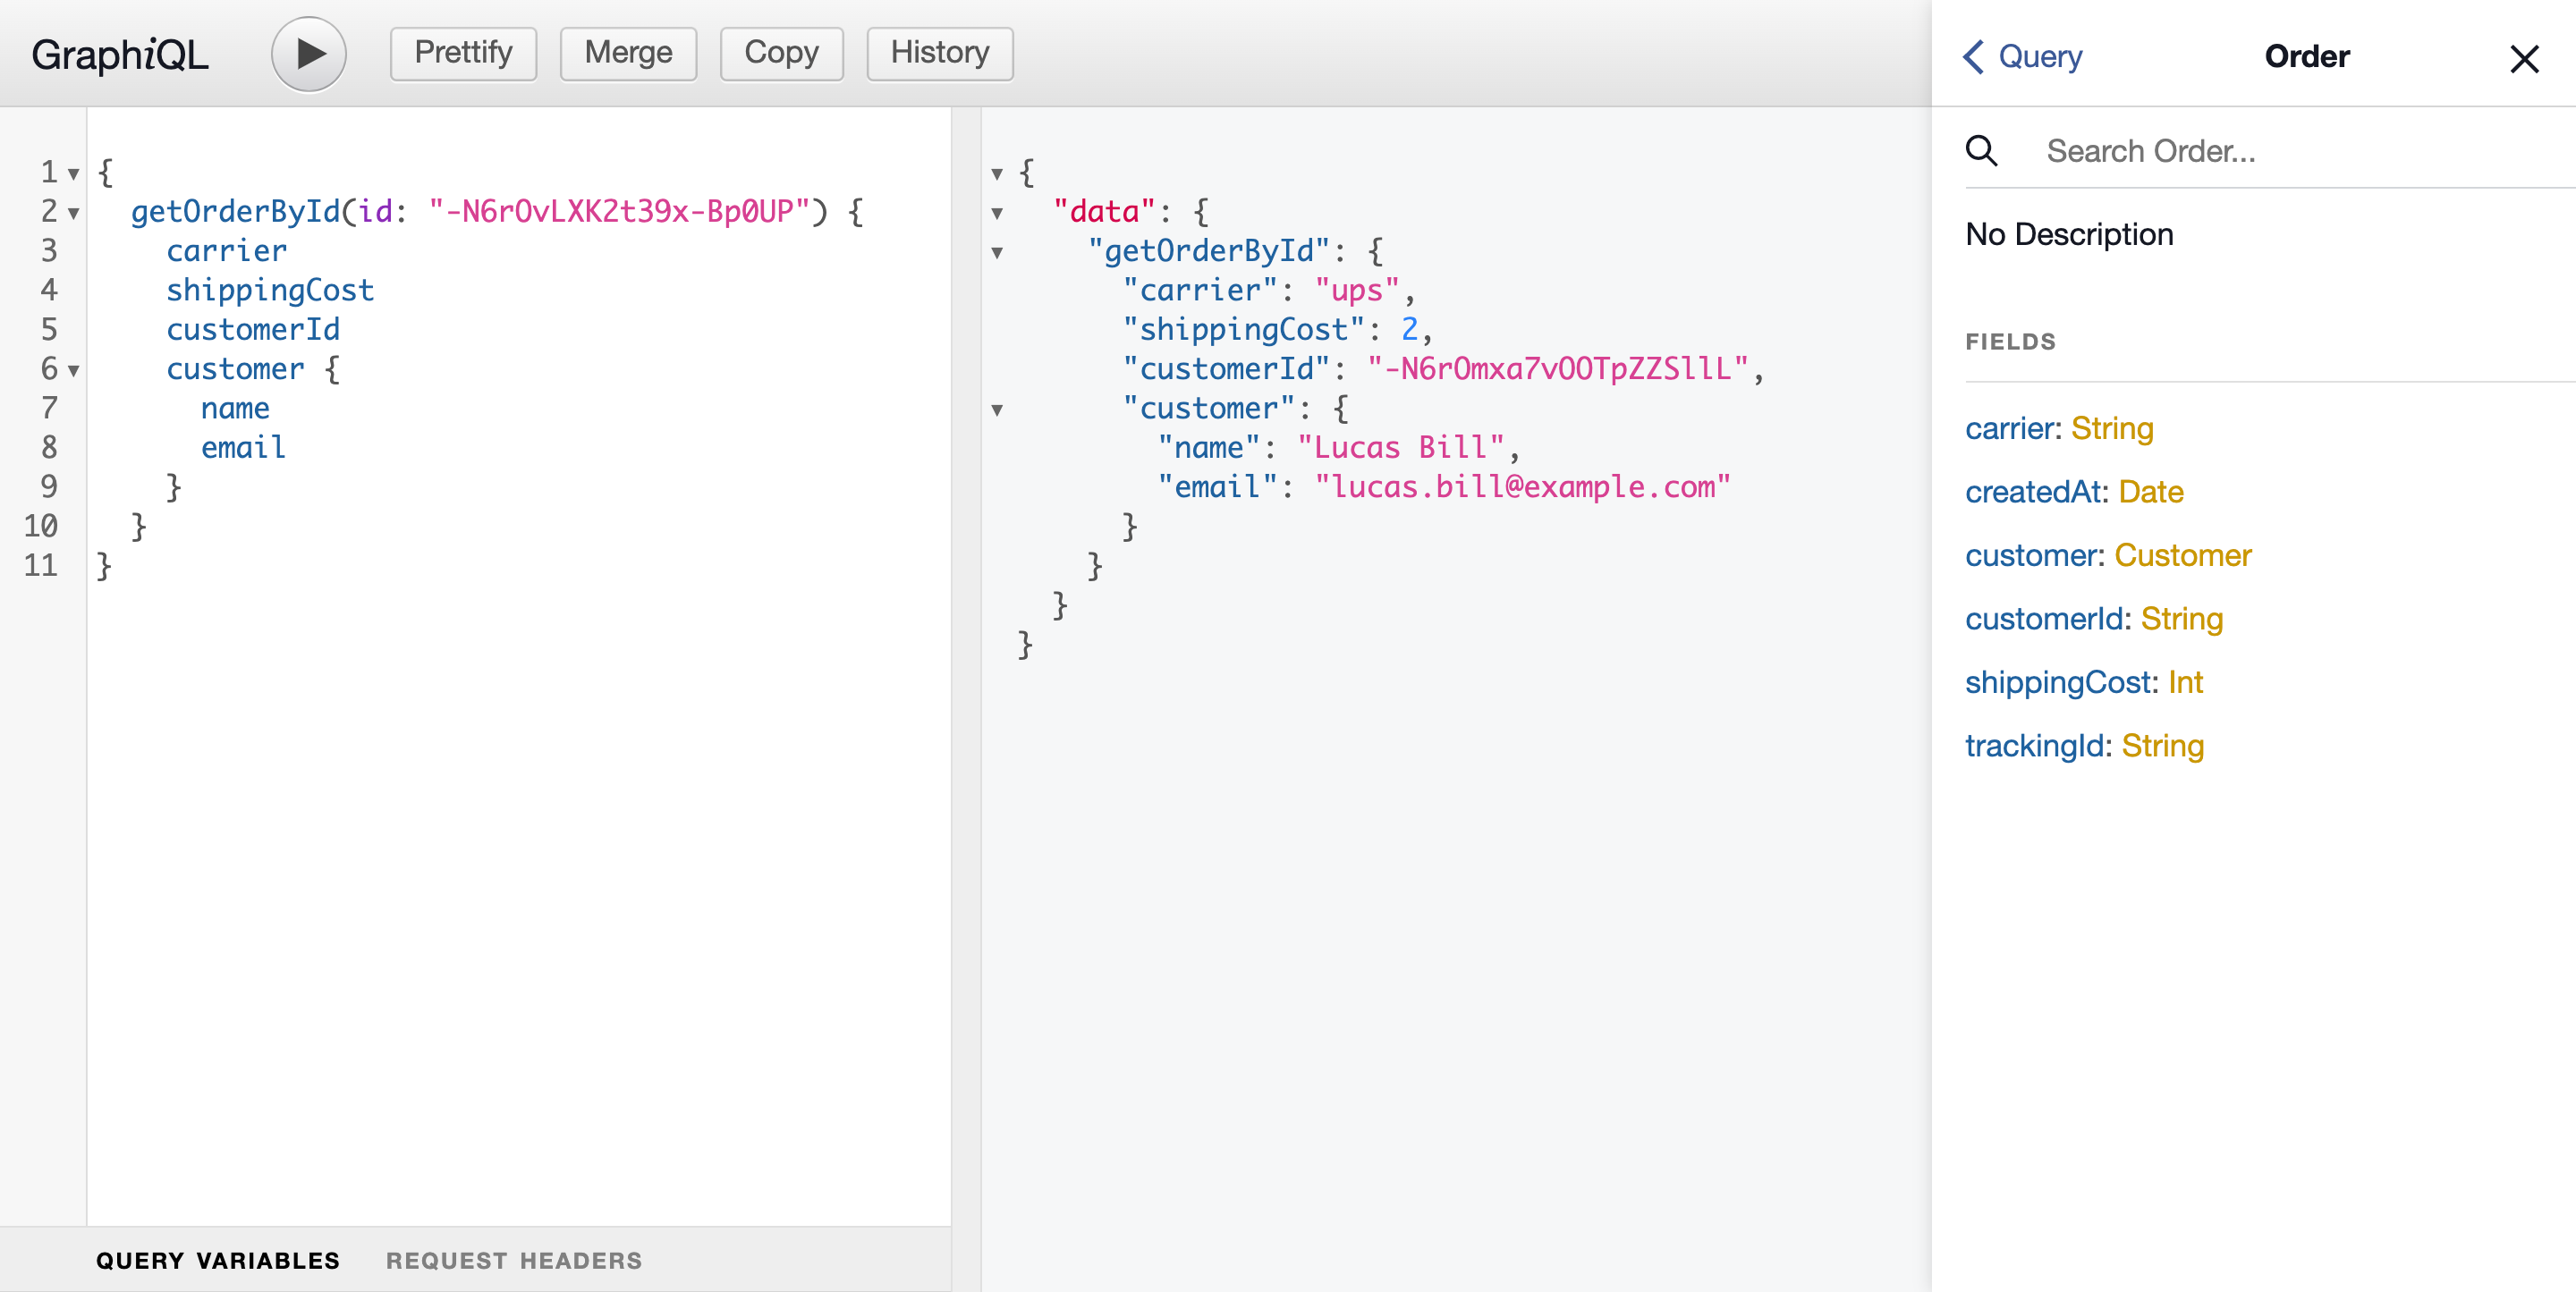
Using the query getOrderById you can now retrieve a single order, for example:
{
  getOrderById(id: "-N6rOvLXK2t39x-Bp0UP") {
    carrier
    shippingCost
    customerId
  }
}
You can see that this query also returns customerId. This field references the customers we also have in our database. With the @materializer directive, you can use this value to retrieve the customer and link it to the response type for the or
type Order {
  carrier: String
  createdAt: Date
  customerId: String
  customer: Customer
    @materializer(
      query: "getCustomerById"
      arguments: [{ name: "id", field: "customerId" }]
    )
  shippingCost: Int
  trackingId: String
}
With this addition, you can retrieve the customer information for every order by adding the field customer and the subfields you want to include.
Using @materializer you can combine any available data to query in your GraphQL schema. Not only data which is coming from the same database, but also data from external sources - such as another database, third-party REST APIs, and more. In the next section, we'll add logic to add more data to the Firebase Realtime Database.
Use mutations to add and update data
Finally, we'll add new data to the Firebase Realtime Database using GraphQL. The REST API from Firebase allows you to both insert and update data. The request returns the ID of the updated or inserted value when successful.
Let's try to insert a new customer to the database by adding the mutation and response type below to your GraphQL schema in customer/index.graphql:
type Response {
  name: ID
}

type Mutation {
  insertCustomer(name: String!, email: String!): Customer
    @rest(
      endpoint: "https://$project_id.firebaseio.com/customers.json"
      method: POST
      postbody: """
      {
        "name": "{{.Get "name"}}",
        "email": "{{.Get "email"}}"
      }
      """
      configuration: "firebase_config"
    )
}
This mutation requires the query parameters name and string and passes their values to the underlying REST API using the postbody field. The syntax {{.Get "VARIABLE_NAME"}} is used here to get the value that's passed to the GrapQL Query.
When you use the following query:
mutation {
  insertCustomer(name: "Peter", email: "peter.parker@avengers.com") {
    name
  }
}
The response looks something like this:
{
  "data": {
    "insertCustomer": {
      "name": "-N7WtNDgHYjCrED--Bq3"
    }
  }
}
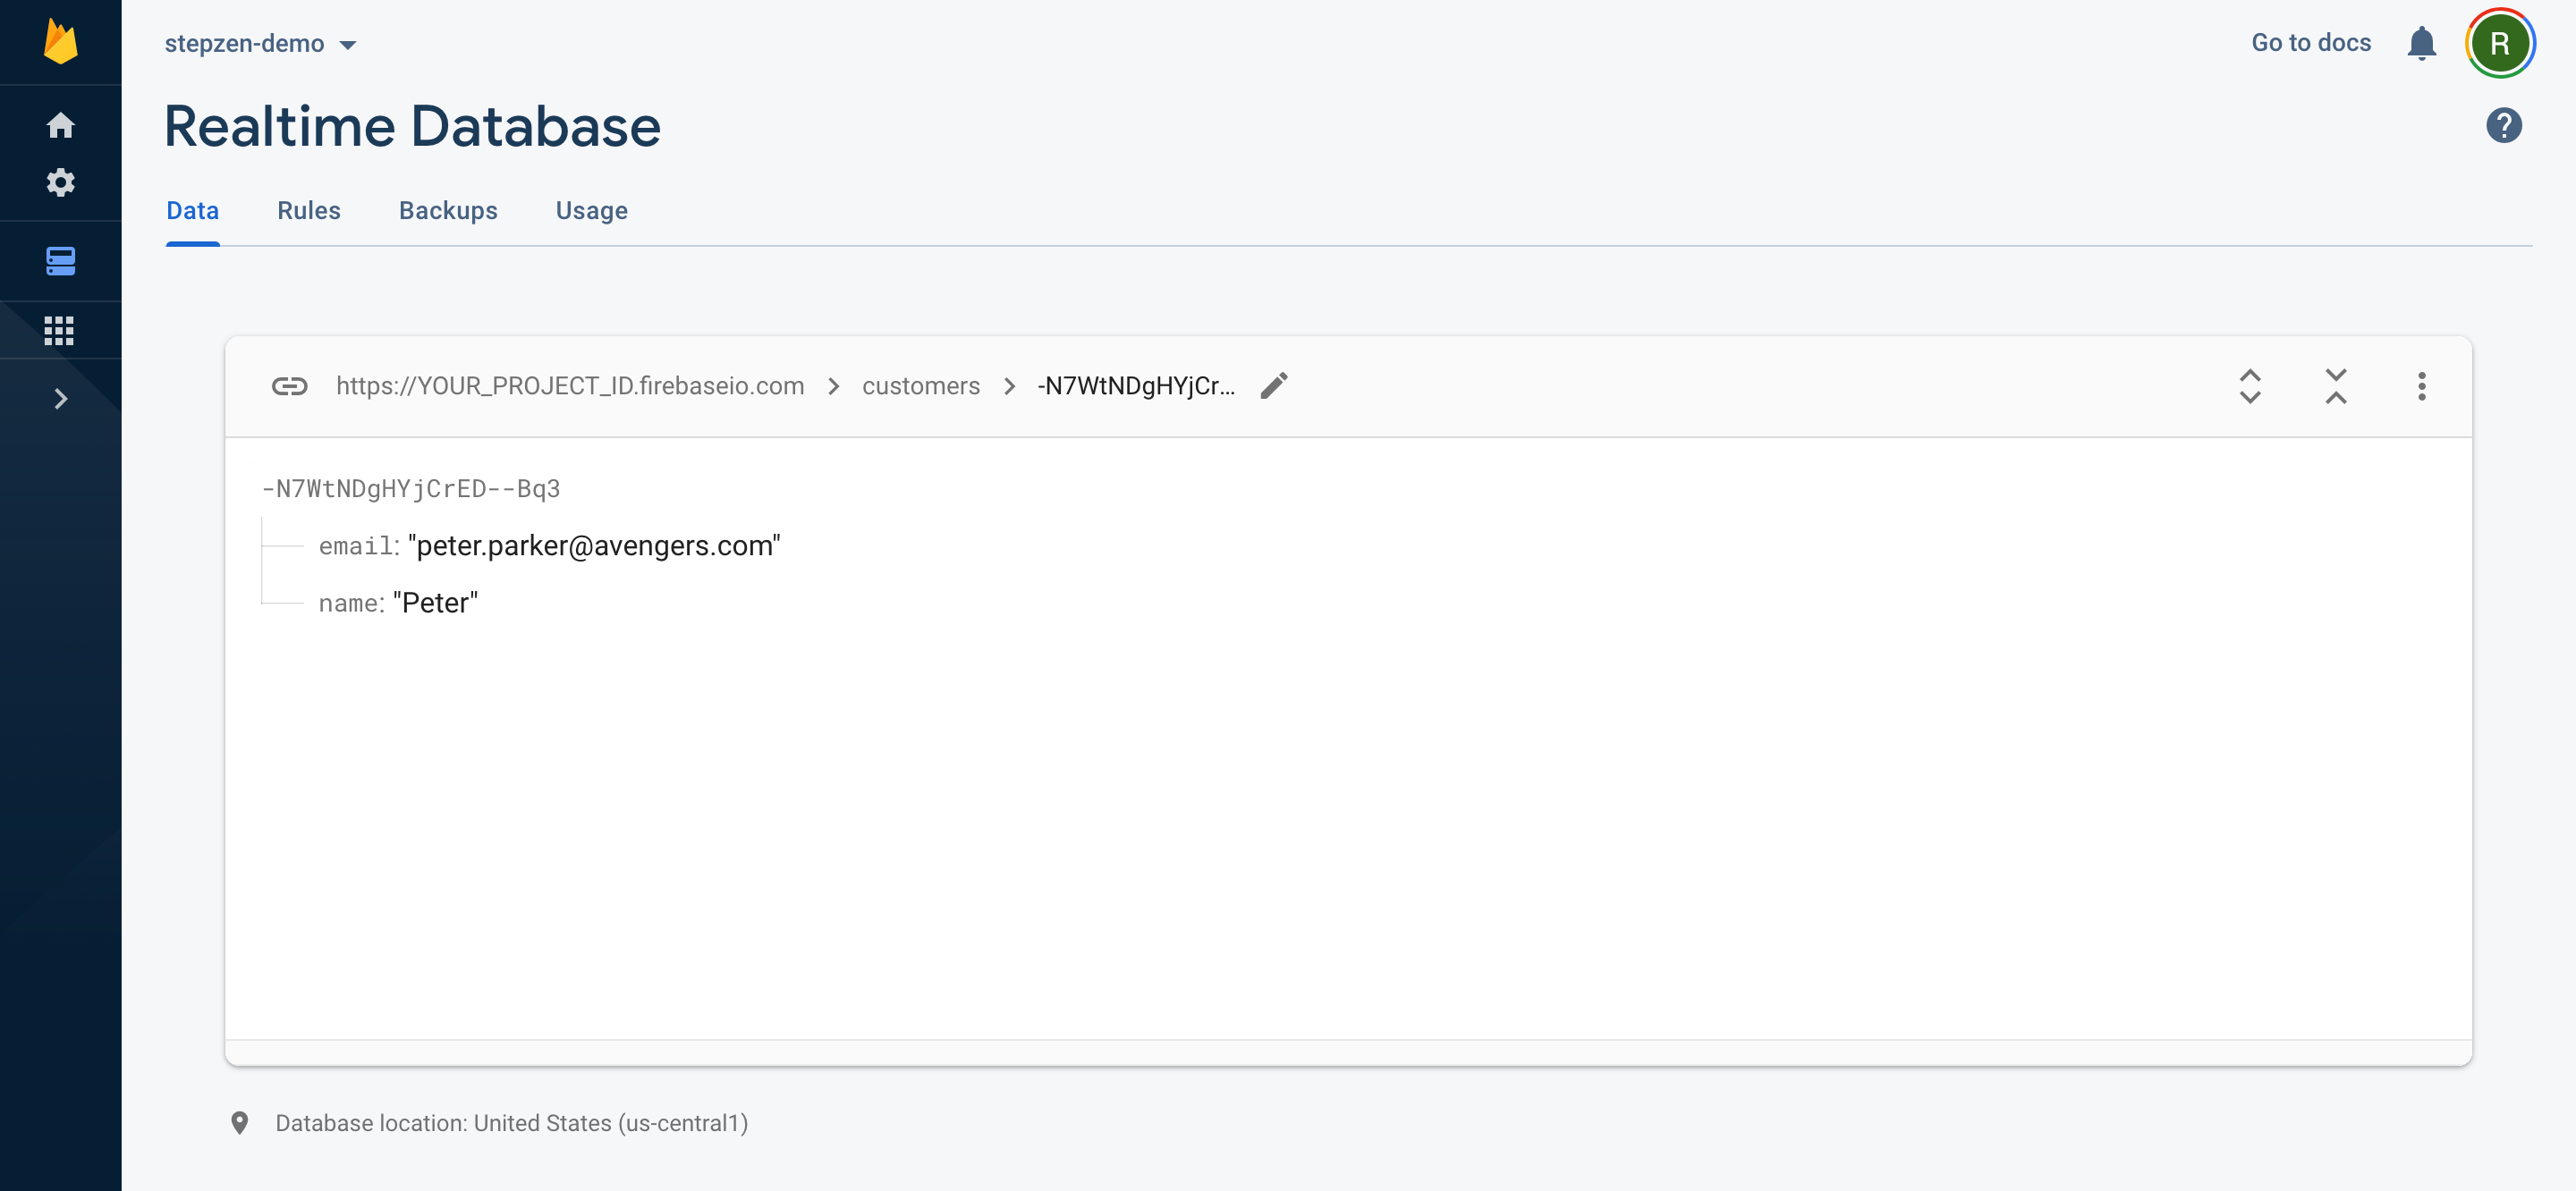
You can validate if the customer with the name "Peter" has been added with the getCustomerById query and the returned ID. Also, you can find this new customer in the Firebase console:
Not only can you insert new data, but you can also update existing data. You have two options when updating specific fields or replacing the entire JSON data for an ID. In this article, we'll use PATCH as PUT will overwrite the data at the specified location, including any child nodes.
Adding the new mutation below to your schema in customer/index.graphql:
type Mutation {
  insertCustomer(name: String!, email: String!): Response
    @rest(
      ## ...
    )
  updateCustomerName(id: ID!, name: String!): Customer
    @rest(
      endpoint: "https://YOUR_PROJECT_ID.firebaseio.com/customers/$id.json"
      method: PATCH
      postbody: """
      {
        "name": "{{.Get "name"}}"
      }
      """
      configuration: "firebase_config"
    )
}
Allows you to update the name of the customer. Suppose you want to change the name of the customer we've just created from "Peter" to "Peter Parker", you can do it like this:
mutation {
  updateCustomerName(id: "-N7WtNDgHYjCrED--Bq3", name: "Peter Parker") {
    name
  }
}
Note that the response type of the query
updateCustomerNameisCustomerinstead ofResponse, asPATCHrequests to the Firebase REST API returns the updated value.
That's it. You have now created a GraphQL schema for a Firebase Realtime Database. When you want to take this into production, don't forget to enable authentication for your REST API endpoint from Firebase.
Conclusion
In this article, we created a GraphQL API for a Firebase Realtime database using REST APIs. This GraphQL API lets you query and mutate data and make combinations between different entities. You can find the complete code in our Github examples repository, and watch the video on our Youtube channel. We would love to hear what project you start building with StepZen and Firebase. Join our Discord to stay updated with our community.